Leon's Blog

分享一点有趣的技术

0%

Triton 初探

image-20250605183401865

Triton源码构建

总共分为三种:

  1. 直接pip包管理

    1
    pip install triton
  2. 部分源码编译

    1
    2
    3
    4
    5
    6
    7
    8
    git clone https://github.com/triton-lang/triton.git
    cd triton

    python -m venv .venv --prompt triton
    source .venv/bin/activate

    pip install ninja cmake wheel pybind11 # build-time dependencies
    pip install -e . -i https://pypi.tuna.tsinghua.edu.cn/simple

    这个构建方式十分简单方便。另一个中方法是llvm源码编译,triton用debug 模式pip编译,具体可以参考先进编译实验室:triton安装

  3. 完全的源码编译(LLVM, Triton source code源码编译)

    这种编译方式其实就是第二种源码编译方式的c++部分编译(triton底层代码)。这种源码编译方式主要是为了triton c++部分代码开发提供支持,详细流程参考Triton Development guide。主要构建流程如下:

    • 虚拟环境配置(主要install pybind11)

    • git clone指定版本的triton和llvm

      1
      2
      3
      4
      5
      cd ./triton-workspace
      git clone git@github.com:micropuma/triton.git
      git clone git@github.com:llvm/llvm-project.git
      cd llvm-project
      git checkout 8957e64a20fc7f4277565c6cfe3e555c119783ce # 对应版本参考cmake/llvm-hash.txt
    • 源码编译llvm,使用如下脚本:

      1
      2
      3
      4
      5
      6
      7
      8
      9
      10
      11
      12
      13
      14
      15
      16
      17
      18
      19
      20
      21
      22
      23
      24
      25
      26
      27
      28
      29
      30
      31
      32
      33
      34
      35
      36
      37
      38
      39
      40
      41
      42
      43
      44
      45
      46
      47
      48
      49
      50
      51
      52
      53
      #!/bin/bash
      # 脚本名称:configure_mlir.sh
      # 功能:配置并生成LLVM/MLIR的Ninja构建文件
      # 参数:<source-dir> <target-dir> <build-type>
      # 示例:./configure_mlir.sh llvm-project/llvm build/mlir-debug Debug

      # 严格模式:遇到错误立即退出,未定义变量报错
      set -euo pipefail

      # 参数校验
      if [ $# -lt 3 ]; then
      echo "错误:参数不足"
      echo "用法:$0 <source-dir> <target-dir> <build-type>"
      echo "示例:$0 llvm-project/llvm build/mlir Debug"
      exit 1
      fi

      SOURCE_DIR="$1"
      TARGET_DIR="$2"
      BUILD_TYPE="$3"

      # 检查CMake是否安装
      if ! command -v cmake &> /dev/null; then
      echo "错误:未找到CMake,请先安装CMake"
      exit 1
      fi

      # 检查Clang编译器
      if ! command -v clang &> /dev/null || ! command -v clang++ &> /dev/null; then
      echo "警告:未找到Clang编译器,将使用系统默认编译器"
      CLANG_CC=""
      CLANG_CXX=""
      else
      CLANG_CC="$(which clang)"
      CLANG_CXX="$(which clang++)"
      fi

      # 创建目标目录(如果不存在)
      mkdir -p "$TARGET_DIR"

      # 执行CMake配置
      cmake -GNinja \
      -S "$SOURCE_DIR" \
      -B "$TARGET_DIR" \
      -DCMAKE_BUILD_TYPE="$BUILD_TYPE" \
      -DCMAKE_EXPORT_COMPILE_COMMANDS=ON \
      ${CLANG_CC:+-DCMAKE_C_COMPILER="$CLANG_CC"} \
      ${CLANG_CXX:+-DCMAKE_CXX_COMPILER="$CLANG_CXX"} \
      -DLLVM_ENABLE_PROJECTS="llvm;mlir" \
      -DLLVM_TARGETS_TO_BUILD="AMDGPU;NVPTX;X86;AArch64"

      echo "✅ 配置成功!构建目录:$TARGET_DIR"
      echo "➜ 编译命令:cmake --build $TARGET_DIR -j $(nproc)"

      这个脚本十分详细,根据脚本的参数要求源码编译即可

    • Triton源码编译同理

      1
      2
      3
      4
      5
      6
      7
      8
      9
      10
      11
      12
      13
      14
      15
      16
      17
      18
      19
      20
      21
      22
      23
      24
      25
      26
      27
      28
      29
      30
      31
      32
      33
      34
      35
      36
      37
      38
      39
      40
      41
      42
      43
      44
      45
      46
      47
      48
      49
      50
      51
      52
      53
      54
      55
      56
      57
      58
      59
      60
      61
      62
      63
      64
      65
      66
      67
      68
      69
      70
      71
      72
      73
      74
      75
      #!/bin/bash
      # Triton CMake 配置脚本
      # 用法: ./triton_configure.sh <source-dir> <target-dir> <build-type> <mlir-dir>

      # 参数校验
      if [ $# -lt 4 ]; then
      echo "错误:参数不足"
      echo "用法: $0 <source-dir> <target-dir> <build-type> <mlir-dir>"
      echo "示例: $0 triton build/triton-debug Debug build/mlir-debug"
      exit 1
      fi

      SOURCE_DIR="$1"
      TARGET_DIR="$2"
      BUILD_TYPE="$3"
      MLIR_DIR="$4"

      # 检查必要工具
      check_dependency() {
      if ! command -v "$1" &> /dev/null; then
      echo "错误:未安装 $1,请先安装: $2"
      exit 1
      fi
      }
      check_dependency cmake "https://cmake.org/install/"
      check_dependency ninja "https://ninja-build.org/"
      check_dependency clang "https://llvm.org/"

      # 跨平台链接器配置
      if [[ "$(uname)" == "Darwin" ]]; then
      LINKER_FLAGS=()
      else
      LINKER_FLAGS=(
      "-DCMAKE_EXE_LINKER_FLAGS=-fuse-ld=lld"
      "-DCMAKE_MODULE_LINKER_FLAGS=-fuse-ld=lld"
      "-DCMAKE_SHARED_LINKER_FLAGS=-fuse-ld=lld"
      )
      check_dependency lld "sudo apt install lld"
      fi

      # 获取 Triton 仓库根目录
      REPO_BASE_DIR=$(git -C "$SOURCE_DIR" rev-parse --show-toplevel 2>/dev/null)
      if [ $? -ne 0 ]; then
      echo "错误:$SOURCE_DIR 不是有效的 Git 仓库"
      exit 1
      fi

      # 创建目标目录
      mkdir -p "$TARGET_DIR" || { echo "无法创建目录: $TARGET_DIR"; exit 1; }

      # 执行 CMake 配置
      cmake -GNinja \
      -S "$SOURCE_DIR" \
      -B "$TARGET_DIR" \
      -DCMAKE_BUILD_TYPE="$BUILD_TYPE" \
      -DCMAKE_EXPORT_COMPILE_COMMANDS=ON \
      -DTRITON_CODEGEN_BACKENDS="amd;nvidia" \
      -DLLVM_INCLUDE_DIRS="$MLIR_DIR/include" \
      -DLLVM_LIBRARY_DIR="$MLIR_DIR/lib" \
      -DCMAKE_C_COMPILER=clang \
      -DCMAKE_CXX_COMPILER=clang++ \
      -DCMAKE_LINKER=lld \
      "${LINKER_FLAGS[@]}" \
      -DCMAKE_C_COMPILER_LAUNCHER=ccache \
      -DCMAKE_CXX_COMPILER_LAUNCHER=ccache \
      -DTRITON_BUILD_PYTHON_MODULE=ON \
      -DTRITON_BUILD_PROTON=ON \
      -DCUPTI_INCLUDE_DIR="$REPO_BASE_DIR/third_party/nvidia/backend/include" \
      -DROCTRACER_INCLUDE_DIR="$REPO_BASE_DIR/third_party/amd/backend/include" \
      -DJSON_INCLUDE_DIR="$HOME/.triton/json/include" \
      -DLLVM_SYSPATH=/mnt/home/douliyang/triton-workspace/triton-dly-repo/build/mlir-debug \
      -DTRITON_WHEEL_DIR=/mnt/home/douliyang/triton-workspace/triton-dly-repo/build/wheel

      echo "✅ Triton CMake 配置成功!"
      echo "➜ 编译命令: cmake --build $TARGET_DIR -j$(nproc)"
    • 支持vscode 跳转

      1
      2
      # 在triton的源码目录下运行
      ln -s ../build/triton-debug/compile_commands.json ./

    上述流程结束,我们得到libtriton.so动态库,完整编译好c++内容。如何利用pybind编译出python接口封装,有待研究。目前c++编译流程足够开发者学习以及修改c++代码逻辑了。如果是上层开发人员(算子库开发者/专注于python代码,不关注MLIR实现),则第二中源码编译方式is enough。

    编译C++源码一大好处是稳定,方法二的pip install -e .有时候受网速影响,容易寄。

Triton编译流程

主要参考浅析Triton执行流程Deep dive博客。更深入的MLIR pass解读可以参考Triton源码走读

首先,对于Triton整个编译流程先有一个整体上的认识,如图所示是简易示意图:

image-20250613102309608

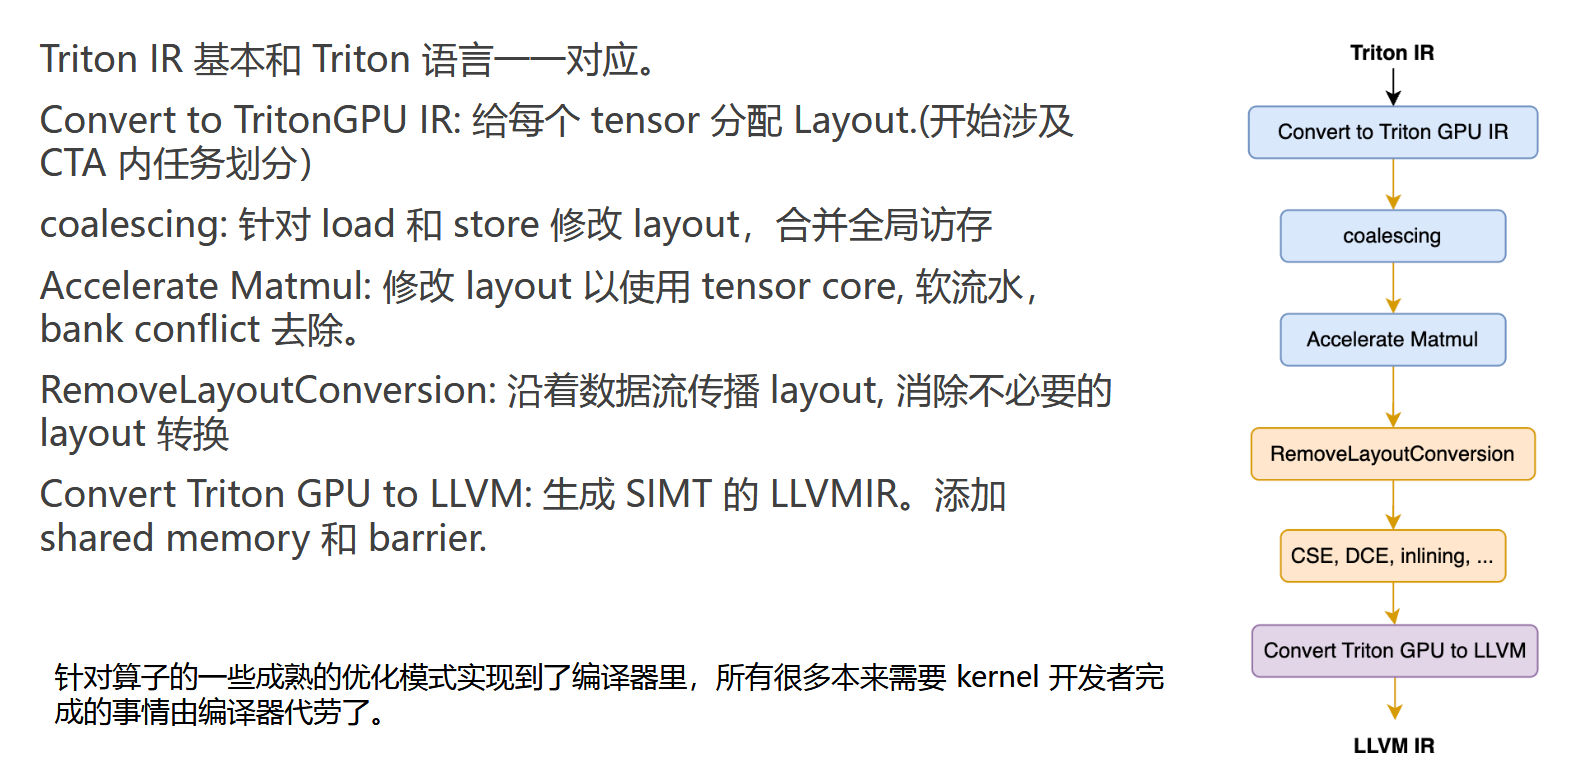
这其中,triton 编译流程从 triton-lang 输入算起,一共会下降到 5 个 stage:triton-lang -> triton ir(描述上层计算) -> triton gpu ir(为tensor分配layout,表达CTA内thread的访存行为) -> llvm ir(nvvm ir) -> ptx -> cubin。

Triton的大部分代码,都是python语言,少量的passes和dialect通过c++实现(MLIR), 并由python做pybind封装调用。因此主要的流程debug工具选用pdb来debug。

Triton整体流程

Triton的核心流程代码主要分布在如下几个文件:

  • /python/triton/tools/compile.py(最上层的compiler工具)
  • /python/triton/runtime/jit.py(运行时工具,包含编译kernel的缓存,源数据管理,driver交互调度kernel)
  • /python/triton/compiler/code_generator.py(主要为DSL生成的AST,代码生成为MLIR IR,即Triton IR,涵盖的都是最直接的ast翻译工作)
  • /third_party/nvidia/backend/compiler.py(针对特定硬件厂商的编译链条,比如英伟达的cuda流程,一般为TritonGPU IR转换,以及ptx等代码生成)
  • triton/python/src/passes.cc(各种pass组织起来,Triton的代码结构相当不错)

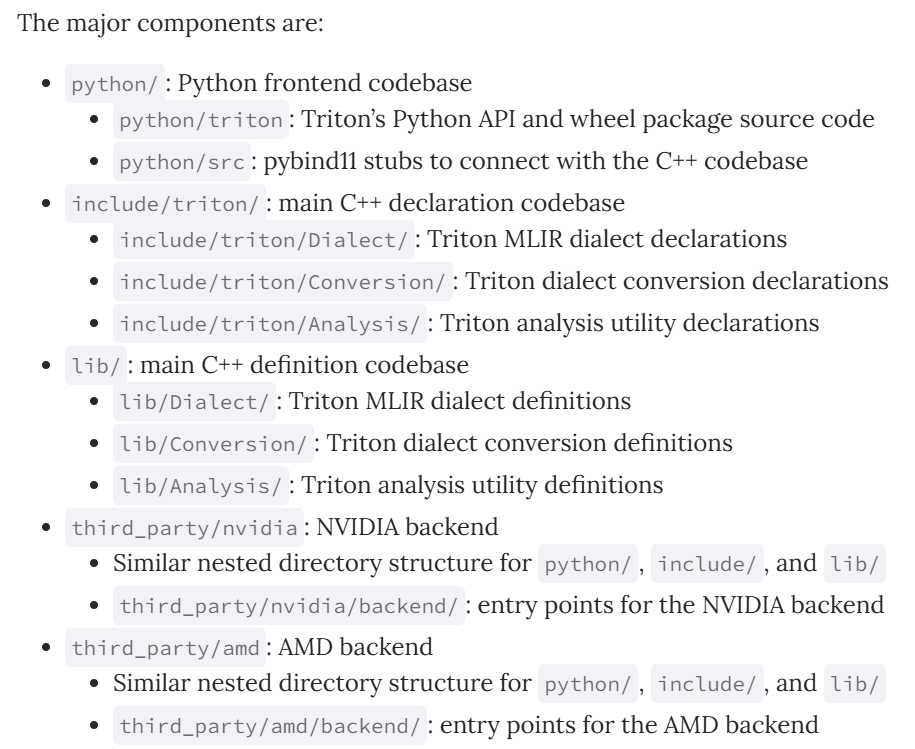
Triton代码仓库的所有文件结构如下:

image-20250618100618003

通过在特定文件中打断点的方式,将整个代码生成流程快速串起来,可以参见下面的流程图(JIT流程图):

image-20250617122912212

上述流程主要集中在Triton的python代码流程,是底层c++的wrapper。为了使读者熟悉Triton的c++代码结构,本博客简要讲解一下如何在TritonGPU IR抽象层级添加一个Hello World Pass。

最简Pass集成教程

  1. First Write A HelloWorld Pass in lib/Dialect/TritonGPU/Transforms directory.
1
2
3
4
5
6
7
8
9
10
11
12
13
14
15
16
17
18
19
20
21
22
23
24
25
26
27
28
29
30
31
32
33
34
35
36
#include "mlir/Support/LLVM.h"
#include "mlir/Transforms/Passes.h"
#include "triton/Analysis/Utility.h"
#include "triton/Dialect/TritonGPU/IR/Dialect.h"
#include "triton/Dialect/TritonGPU/Transforms/Utility.h"

namespace mlir {
namespace triton {
namespace gpu {

#define GEN_PASS_DEF_TRITONGPUPRINTADDIOP
#include "triton/Dialect/TritonGPU/Transforms/Passes.h.inc"

class PrintAddIOpPass
: public impl::TritonGPUPrintAddIOpBase<PrintAddIOpPass> {
public:
void runOnOperation() override {
ModuleOp m = getOperation();
m.walk([&](Operation *op) {
// 检查操作是否为 arith::AddIOp
if (auto addIOp = dyn_cast<arith::AddIOp>(op)) {
// 打印匹配到的 AddIOp 操作
llvm::outs() << "Matched AddIOp: " << addIOp << "\n";
}
});
}
};

// // 注册 pass
// std::unique_ptr<mlir::Pass> mlir::createTritonGPUPrintAddIOp() {
// return std::make_unique<mlir::triton::gpu::PrintAddIOpPass>();
// }

} // namespace gpu
} // namespace triton
} // namespace mlir
  1. Then add pass in CMakeLists.txt in the same directory
1
2
# hellow world pass
PrintAddIOp.cpp
  1. define the pass with the help of tablegen, this should be done in include/triton/TritonGPU/Dialect/Transforms
1
2
3
4
5
6
7
8
9
10
11
12
def TritonGPUPrintAddIOp: Pass<"tritongpu-print-addiop", "mlir::ModuleOp"> {
let summary = "Hello World Pass";

let description = [{
print add op
}];
let dependentDialects = [
"mlir::arith::ArithDialect",
"mlir::cf::ControlFlowDialect",
"mlir::scf::SCFDialect",
];
}
  1. Then finish python wrapper step, do it in python/src/passes.cc
1
2
// Hello World Pass
ADD_PASS_WRAPPER_0("add_print_addiop", createTritonGPUPrintAddIOp);
  1. Integrate the pass in pass pipeline, do it in third_party/nvidia/backend/compiler.py
1
2
3
4
5
passes.ttir.add_convert_to_ttgpuir(pm, f"cuda:{capability}", opt.num_warps, 32, opt.num_ctas)
# optimize TTGIR
passes.ttgpuir.add_coalesce(pm)
# Hello World Opt
# passes.ttgpuir.add_print_addiop(pm)
  1. reinstall triton, use install.sh script is enough

Triton使用教程

这一部分是学习如何使用triton,读者可以参考官方的Triton Tutorial以及Triton-puzzles来学习triton的基础用法。这一章节的例子来源是triton-puzzles中的11个测试case以及官方tutorial,选取其中比较典型的case来讲解Triton编程要点。

要点1:Tile 编程抽象

1
2
3
4
5
6
7
8
9
10
@triton.jit
def demo(x_ptr):
range = tl.arange(0, 8)
# print works in the interpreter
print(range)
x = tl.load(x_ptr + range, range < 5, 0)
print(x)

triton_viz.trace(demo)[(1, 1, 1)](torch.ones(4, 3))
triton_viz.launch()

要点2:多维指针计算

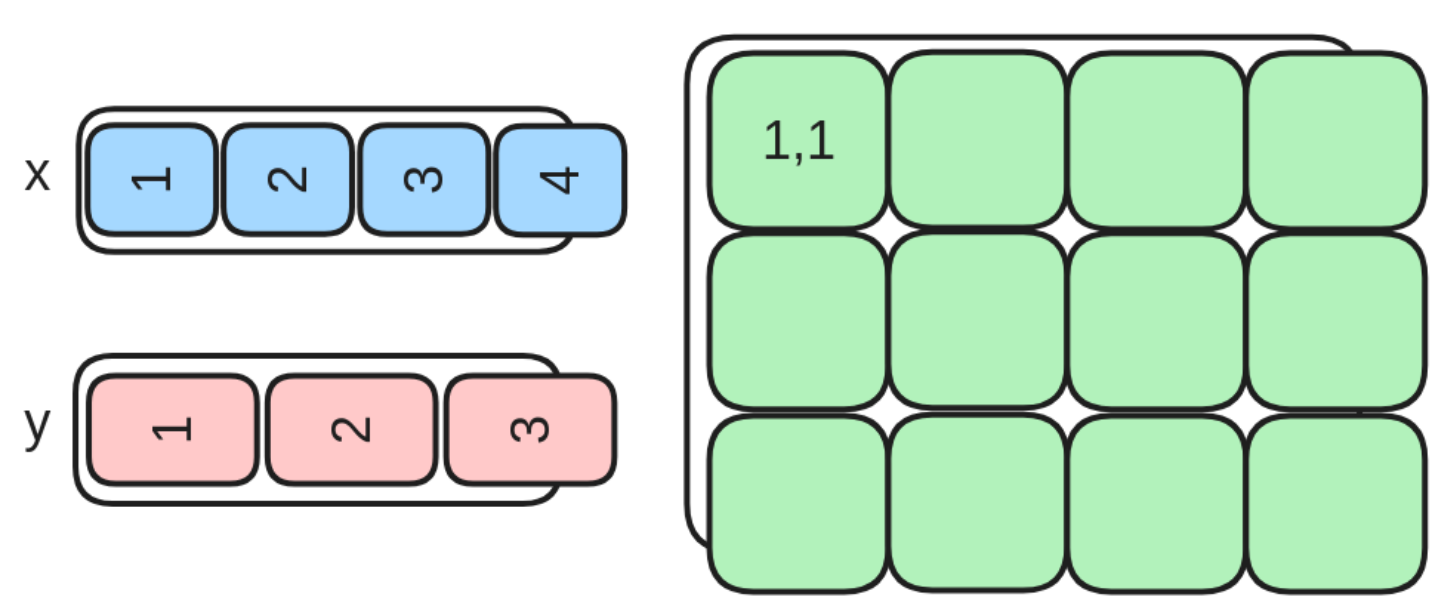
下面这个任务主要完成外积+relu算子的triton实现。参照pytorch的实现:

1
return torch.relu(x[None, :] * y[:, None])

该任务用图形表示如下:

image-20250605194322002

如下是具体的算子实现:

1
2
3
4
5
6
7
8
9
10
11
12
13
14
15
16
17
18
19
20
21
22
def mul_relu_block_spec(x: Float32[Tensor, "100"], y: Float32[Tensor, "90"]) -> Float32[Tensor, "90 100"]:
return torch.relu(x[None, :] * y[:, None])

@triton.jit
def mul_relu_block_kernel(x_ptr, y_ptr, z_ptr, N0, N1, B0: tl.constexpr, B1: tl.constexpr):
pid_0 = tl.program_id(axis=0)
pid_1 = tl.program_id(axis=1)

x_range = tl.arange(0, B0)[None, :] + pid_0 * B0
y_range = tl.arange(0, B1)[:, None] + pid_1 * B1

x_mask = x_range < N0
y_mask = y_range < N1
z_mask = x_mask & y_mask
z_range = y_range * N0 + x_range

x = tl.load(x_ptr + x_range, x_mask)
y = tl.load(y_ptr + y_range, y_mask)
tl.store(z_ptr + z_range, tl.maximum(x * y, 0), z_mask)
return

test(mul_relu_block_kernel, mul_relu_block_spec, nelem={"N0": 100, "N1": 90})

这个示例中,比较重要的细节是存储空间的位置定位,即指针计算。如下是一个比较易懂的解释:

对于一个2D Tensor XX[i, j]的内存位置为&X[i, j] = X + i*stride_xi + j*stride_xj。因此,对于A[m : m+BLOCK_SIZE_M, k:k+BLOCK_SIZE_K]B[k : k+BLOCK_SIZE_K, n : n+BLOCK_SIZE_N]的块指针可以用下面的伪代码定义:

1
2
&A[m : m+BLOCK_SIZE_M, k:k+BLOCK_SIZE_K] =  a_ptr + (m : m+BLOCK_SIZE_M)[:, None]*A.stride(0) + (k : k+BLOCK_SIZE_K)[None, :]*A.stride(1);
&B[k : k+BLOCK_SIZE_K, n:n+BLOCK_SIZE_N] = b_ptr + (k : k+BLOCK_SIZE_K)[:, None]*B.stride(0) + (n : n+BLOCK_SIZE_N)[None, :]*B.stride(1);

在代码中,具体计算如下:

1
2
x_range = tl.arange(0, B0)[None, :] + pid_0 * B0
y_range = tl.arange(0, B1)[:, None] + pid_1 * B1

这两行定位该pid需要处理的tile的x和y上的范围,其中x是一个行向量,而y是一个列向量。

获取x和y的处理范围后,需要计算z的处理范围。

1
z_range = y_range * N0 + x_range

这里有两个细节:

  • 加法自带传播。
  • triton的底层实现,内存是按照指针的方式获取。因此y_range需要乘以x向量的长度。

要点3:Triton的padding机制

Triton的一个重要限制是每个块必须包含2的幂次方个元素,因此如果我们想处理任何可能的输入形状,我们需要在内部对每行进行“pad”以及对内存访问操作进行保护(也就是防止越界)。

要点4:Reduction

1
2
3
4
5
6
7
8
9
10
11
12
13
14
15
16
17
18
19
20
21
22
23
def sum_spec(x: Float32[Tensor, "4 200"]) -> Float32[Tensor, "4"]:
return x.sum(1)

@triton.jit
def sum_kernel(x_ptr, z_ptr, N0, N1, T, B0: tl.constexpr, B1: tl.constexpr):
pid_0 = tl.program_id(0)
row_offset = tl.arange(0, B0)[:, None] + pid_0 * B0

# 累加
acc = tl.zeros((B0, 1), dtype=tl.float32)

for col_block_offset in tl.range(0, T, B1):
col_offset = tl.arange(0, B1)[None, :] + col_block_offset
row_col_offset = row_offset * T + col_offset
row_mask = row_offset < N0
col_mask = col_offset < T

# 二维度
x_block = tl.load(x_ptr + row_col_offset, row_mask & col_mask, other=0)
acc += x_block.sum(axis=1, keep_dims=True)

tl.store(z_ptr + row_offset, acc, row_mask)
test(sum_kernel, sum_spec, B={"B0": 1, "B1": 32}, nelem={"N0": 4, "N1": 32, "T": 200})

Softmax算子实现

1
2
3
4
5
6
7
8
9
10
11
12
13
14
15
16
17
18
19
20
21
22
23
24
25
26
27
28
29
30
31
32
33
34
35
36
37
38
39
40
41
42
43
44
45
46
47
48
49
50
51
52
53
54
55
56
57
def softmax_spec(x: Float32[Tensor, "4 200"]) -> Float32[Tensor, "4 200"]:
x_max = x.max(1, keepdim=True)[0]
x = x - x_max
x_exp = x.exp()
return x_exp / x_exp.sum(1, keepdim=True)

@triton.jit
def softmax_kernel(x_ptr, z_ptr, N0, N1, T, B0: tl.constexpr, B1: tl.constexpr):
pid_0 = tl.program_id(0)
log2_e = 1.44269504

row_offset = pid_0 * B0 + tl.arange(0, B0)
row_mask = row_offset < N0

# x_max用于记录每一行的最大值是多少
x_max = tl.full((B0,), -float('inf'), dtype=tl.float32)

# 先求每行的max值
for col_block_index in tl.range(0, T, B1):
col_offset = tl.arange(col_block_index, col_block_index + B1)
col_mask = col_offset < T

row_col_offset = row_offset[:, None] * T + col_offset[None, :]
row_col_mask = row_mask[:, None] & col_mask[None, :]
x = tl.load(x_ptr + row_col_offset, row_col_mask, other=0)

# tl.maximum是多维度比较,tl.max是归约操作
x_max = tl.maximum(x_max, tl.max(x, axis=1))

# 求每行的exp的和
sum_exp = tl.zeros((B0,), dtype=tl.float32)
for col_block_index in tl.range(0, T, B1):
col_offset = tl.arange(col_block_index, col_block_index + B1)
col_mask = col_offset < T

row_col_offset = row_offset[:, None] * T + col_offset[None, :]
row_col_mask = row_mask[:, None] & col_mask[None, :]
x = tl.load(x_ptr + row_col_offset, row_col_mask, other=0)
x_exp = tl.exp2(log2_e * (x - x_max[:, None]))
sum_exp += tl.sum(x_exp, axis=1)

# 求每个点值的softmax
for col_block_index in tl.range(0, T, B1):
col_offset = tl.arange(col_block_index, col_block_index + B1)
col_mask = col_offset < T

row_col_offset = row_offset[:, None] * T + col_offset[None, :]
row_col_mask = row_mask[:, None] & col_mask[None, :]
x = tl.load(x_ptr + row_col_offset, row_col_mask, other=0)
x_exp = tl.exp2(log2_e * (x - x_max[:, None]))
z_exp = x_exp / sum_exp[:, None]
tl.store(z_ptr + row_col_offset, z_exp, row_col_mask)

return

test(softmax_kernel, softmax_spec, B={"B0": 1, "B1":32},
nelem={"N0": 4, "N1": 32, "T": 200})

上述代码实现是最简单的3-passes softmax实现:

image-20250608192027607

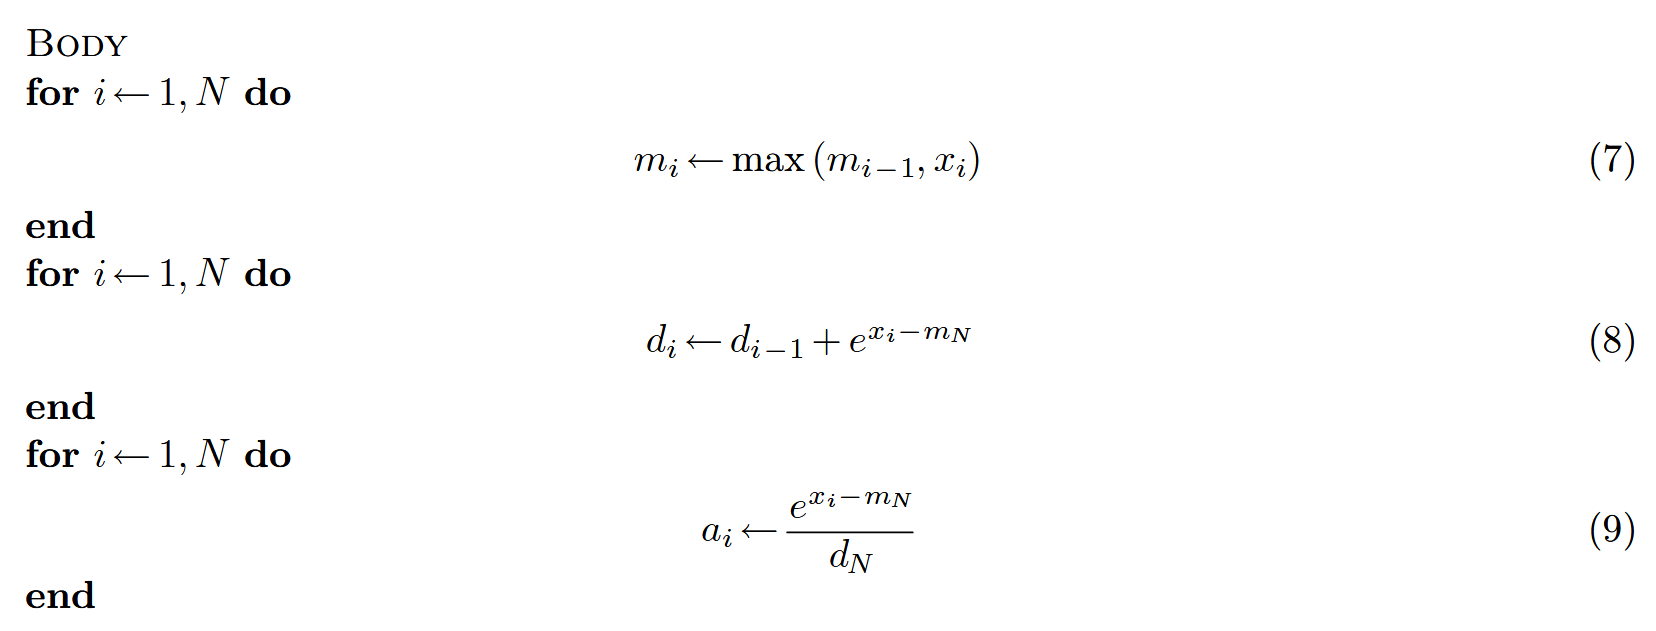
具体细节可以参考FlashAttention讲义。在online 版本的softmax中,提出一种可以将公式7和公式8融合的实现方式:

image-20250608193202857

1
2
3
4
5
6
7
8
9
10
11
12
13
14
15
16
17
18
19
20
21
22
23
24
25
26
27
28
29
30
31
32
33
34
35
36
37
38
39
40
41
42
43
44
45
46
47
48
49
50
51
52
53
54
def softmax_spec(x: Float32[Tensor, "4 200"]) -> Float32[Tensor, "4 200"]:
x_max = x.max(1, keepdim=True)[0]
x = x - x_max
x_exp = x.exp()
return x_exp / x_exp.sum(1, keepdim=True)

@triton.jit
def softmax_kernel(x_ptr, z_ptr, N0, N1, T, B0: tl.constexpr, B1: tl.constexpr):
pid_0 = tl.program_id(0)
log2_e = 1.44269504

row_offset = pid_0 * B0 + tl.arange(0, B0)
row_mask = row_offset < N0

# x_max用于记录每一行的最大值是多少
x_max = tl.full((B0,), -float('inf'), dtype=tl.float32)
# 求每行的exp的和
sum_exp = tl.zeros((B0,), dtype=tl.float32)

for col_block_index in tl.range(0, T, B1):
col_offset = tl.arange(col_block_index, col_block_index + B1)
col_mask = col_offset < T

row_col_offset = row_offset[:, None] * T + col_offset[None, :]
row_col_mask = row_mask[:, None] & col_mask[None, :]
x = tl.load(x_ptr + row_col_offset, row_col_mask, other=0)

# 计算当前前缀和的最大值3
x_max_now = tl.maximum(x_max, tl.max(x, axis=1))
exp_max_sub = tl.exp2(log2_e * (x_max - x_max_now))
exp_cur = tl.exp2(log2_e * (x - x_max_now[:, None]))

# 递归推导
print(exp_cur.shape)
# 注意exp_cur的维度
sum_exp = sum_exp * exp_max_sub + tl.sum(exp_cur, axis=1)
x_max = x_max_now

# 求每个点值的softmax
for col_block_index in tl.range(0, T, B1):
col_offset = tl.arange(col_block_index, col_block_index + B1)
col_mask = col_offset < T

row_col_offset = row_offset[:, None] * T + col_offset[None, :]
row_col_mask = row_mask[:, None] & col_mask[None, :]
x = tl.load(x_ptr + row_col_offset, row_col_mask, other=0)
x_exp = tl.exp2(log2_e * (x - x_max[:, None]))
z_exp = x_exp / sum_exp[:, None]
tl.store(z_ptr + row_col_offset, z_exp, row_col_mask)

return

test(softmax_kernel, softmax_spec, B={"B0": 1, "B1":32},
nelem={"N0": 4, "N1": 32, "T": 200})

参考资料

  1. Triton-Puzzles
  2. Triton入门教程
  3. Triton Developement Guide